网站建设规划与管理 试卷开鲁seo网站
对于做Android App的小伙伴来说setContentView这个方法再熟悉不过了,那么有多少小伙伴知道它的调用到底做了多少事情呢?下面就让我们来看看它背后的故事吧?
setContentView()方法将分为两节来讲:
第一节:如何获取DecorView和contentParent
第二节:如何将R.layout.activity_main.xml的布局渲染到contentParent中
这节先来讲如何获取DecorView和contentParent
我们新建一个Activity时,onCreate()方法中就会自动调用setContentView()方法
@Overrideprotected void onCreate(Bundle savedInstanceState) {super.onCreate(savedInstanceState);setContentView(R.layout.activity_main);}
这里看着是setContentView方法将我们自己写的R.layout.activity_main的布局文件传下去,其实这里这后边还是做了很多事情的。
这里需要分两种情况
一:MainActivity继承于Activity
二:MainAcitivity继承于AppCompatActivity
第一种情况:MainActivity继承于Activity
1.执行setContentView(R.layout.activity_main)方法后会进入到Activity.java的setContentView方法中
public void setContentView(@LayoutRes int layoutResID) {getWindow().setContentView(layoutResID);initWindowDecorActionBar();}
可以看到会调用getWindow().setContentView(layoutResID);,这个getWindow()是获取的其实就是phoneWindow
2.执行phoneWindow的setContentView方法
@Overridepublic void setContentView(int layoutResID) {// Note: FEATURE_CONTENT_TRANSITIONS may be set in the process of installing the window// decor, when theme attributes and the like are crystalized. Do not check the feature// before this happens.if (mContentParent == null) {//创建DecorView,得到mContentParent installDecor();} else if (!hasFeature(FEATURE_CONTENT_TRANSITIONS)) {mContentParent.removeAllViews();}if (hasFeature(FEATURE_CONTENT_TRANSITIONS)) {final Scene newScene = Scene.getSceneForLayout(mContentParent, layoutResID,getContext());transitionTo(newScene);} else {//将我们传入的R.layout.activity_main.xml渲染到mContentParentmLayoutInflater.inflate(layoutResID, mContentParent);}mContentParent.requestApplyInsets();final Callback cb = getCallback();if (cb != null && !isDestroyed()) {cb.onContentChanged();}mContentParentExplicitlySet = true;}
我们可以看到这里做了两件事情
(1)执行installDecor();创建出DecorView和拿到contentParent
private void installDecor() {mForceDecorInstall = false;if (mDecor == null) {//当mDecor == null时调用generateDecor创建一个DecorViewmDecor = generateDecor(-1);....//省略代码} else {//当mDecor != null时将这个phoneWindow传个mDecormDecor.setWindow(this);}if (mContentParent == null) {mContentParent = generateLayout(mDecor);....//省略代码}}}
1)执行mDecor = generateDecor(-1);方法
protected DecorView generateDecor(int featureId) {...//省略代码,这里创建了一个DecorViewreturn new DecorView(context, featureId, this, getAttributes());}
到这里已经创建除了DecorView
2)执行mContentParent = generateLayout(mDecor);方法
protected ViewGroup generateLayout(DecorView decor) {// Apply data from current theme.TypedArray a = getWindowStyle();...//省略代码} else {// Embedded, so no decoration is needed.//这里我们就以R.layout.screen_simple为例layoutResource = R.layout.screen_simple;// System.out.println("Simple!");}mDecor.startChanging();//将R.layout.screen_simple.xml添加到DecorView中mDecor.onResourcesLoaded(mLayoutInflater, layoutResource);//拿到contentParent com.android.internal.R.id.contentViewGroup contentParent = (ViewGroup)findViewById(ID_ANDROID_CONTENT);if (contentParent == null) {throw new RuntimeException("Window couldn't find content container view");}...//省略代码mDecor.finishChanging();return contentParent;}
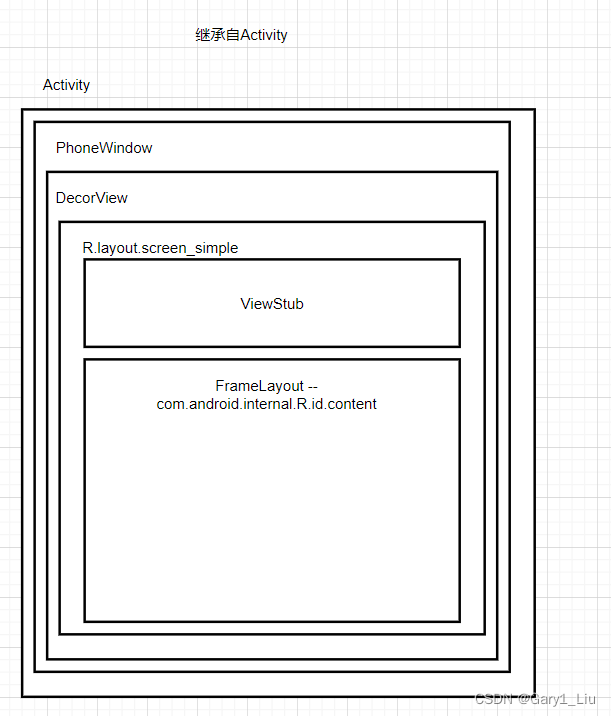
通过设置的属性和创建的Activity的类型会选择一个对应的layoutResource,再通过onResourcesLoaded()方法将选择的layoutResource以addView()的方式添加到创建的DecorView中去,最后执行contentParent = (ViewGroup)findViewById(ID_ANDROID_CONTENT);拿到contentParent,到这一步就会得到下图的窗口布局
第二种情况:MainAcitivity继承于AppCompatActivity
1.执行setContentView(R.layout.activity_main)方法后会进入到AppCompatActivity.java中的setContentView
@Overridepublic void setContentView(@LayoutRes int layoutResID) {getDelegate().setContentView(layoutResID);}
getDelegate()方法中会调用AppCompatDelegate.create(this, this)后new了一个
AppCompatDelegateImpl
@NonNullpublic static AppCompatDelegate create(@NonNull Activity activity,@Nullable AppCompatCallback callback) {return new AppCompatDelegateImpl(activity, callback);}所以这里会走到AppCompatDelegateImpl.java中的setContentView()方法
@Overridepublic void setContentView(int resId) {//创建DecorView,并创建一个subDecorensureSubDecor();ViewGroup contentParent = mSubDecor.findViewById(android.R.id.content);contentParent.removeAllViews();LayoutInflater.from(mContext).inflate(resId, contentParent);mAppCompatWindowCallback.getWrapped().onContentChanged();}1.执行ensureSubDecor();
private void ensureSubDecor() {if (!mSubDecorInstalled) {// 创建一个subDecormSubDecor = createSubDecor();...//省略代码}}
private ViewGroup createSubDecor() {// Now let's make sure that the Window has installed its decor by retrieving it//确保已经拿到了phoneWinow,其实早在AppCompatAcitivy的onCreate()方法中就拿到了phoneWindowensureWindow();//这一步其实就是创建了DeocrView和拿到了contentParentmWindow.getDecorView();...//省略代码if (!mWindowNoTitle) {...//省略代码} else if (mHasActionBar) {...//省略代码} else {if (mOverlayActionMode) {...//省略代码} else {//上边省略的代码就是通过各种设置的判断最后为subDecor找了一个xml//这里就以最简单R.layout.abc_screen_simple.xml为例吧subDecor = (ViewGroup) inflater.inflate(R.layout.abc_screen_simple, null);}...//省略代码//contentView是拿到了R.layout.abc_screen_simple.xml中的R.id.action_bar_activity_contentfinal ContentFrameLayout contentView = (ContentFrameLayout) subDecor.findViewById(R.id.action_bar_activity_content);//windowContentView 是拿到了R.layout.screen_simple.xml中的android.R.id.contentfinal ViewGroup windowContentView = (ViewGroup) mWindow.findViewById(android.R.id.content);if (windowContentView != null) {// There might be Views already added to the Window's content view so we need to// migrate them to our content view//这个while循环的是将windowContentView 中已经添加的View全部移除,然后添加到contentView 中while (windowContentView.getChildCount() > 0) {final View child = windowContentView.getChildAt(0);windowContentView.removeViewAt(0);contentView.addView(child);}// Change our content FrameLayout to use the android.R.id.content id.// Useful for fragments.//这里将R.layout.screen_simple.xml中content的id设置为NO_IDwindowContentView.setId(View.NO_ID);//这里将R.layout.abc_screen_simple.xml中的R.id.action_bar_activity_content设置为android.R.id.contentcontentView.setId(android.R.id.content);// Now set the Window's content view with the decor//将subDecor放入到phonewWinow中mWindow.setContentView(subDecor);...//省略代码//返回subDecorreturn subDecor;}
我们以图的方式来讲解上边的各种操作吧
(1) 执行mWindow.getDecorView();之后会构建出下图
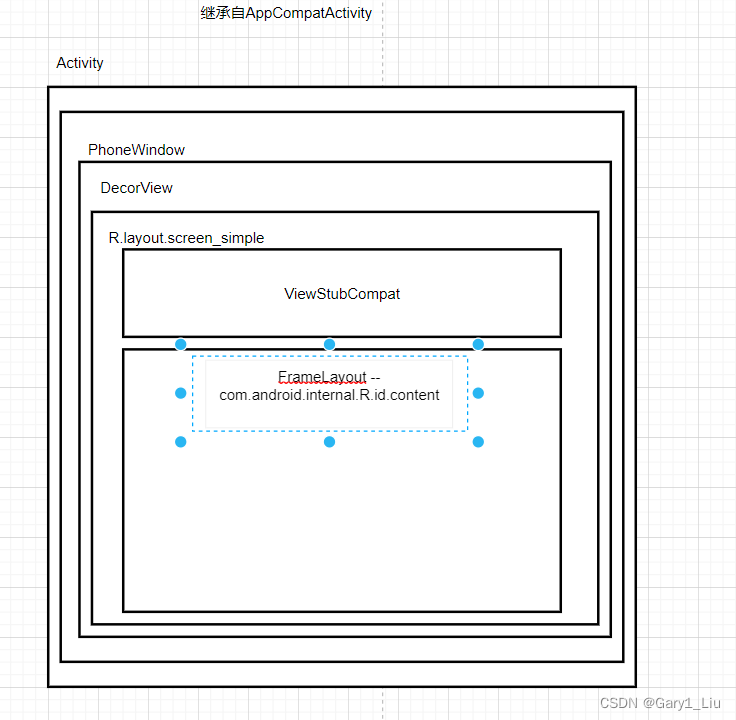
(2)执行 subDecor = (ViewGroup) inflater.inflate(R.layout.abc_screen_simple, null);之后,mSubDecor如下图
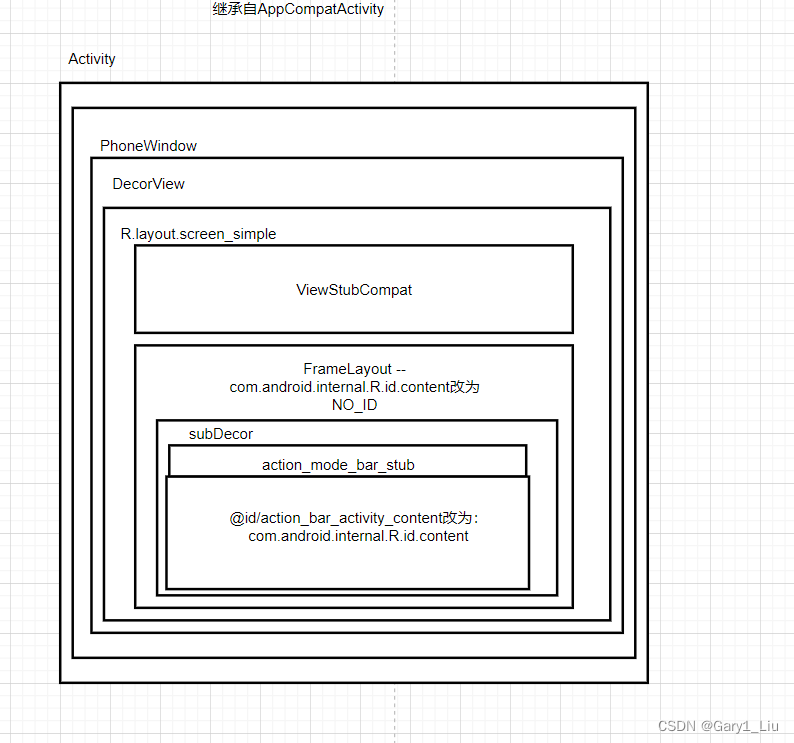
 (3)执行完 windowContentView.setId(View.NO_ID);
执行 contentView.setId(android.R.id.content);
 (5)执行
(5)执行mWindow.setContentView(subDecor);
2.执行 ViewGroup contentParent = mSubDecor.findViewById(android.R.id.content);通过创建的mSubDecor拿到了android.R.id.content
至此,已经拿到了DecorView和contentParent,下一步就是将R.layout.activity_main.xml渲染到contentParent,我们将会在下一节中讲解。