国际贸易网站哪家好网站建设是干嘛的
今天我们将深入探讨::如何在 K8s 集群上部署 Compute storage coupled(存算耦合) 模式的 Doris 高可用集群?
本文,我将为您提供一份全面的实战指南,逐步引导您完成以下关键任务:
- 配置 Doris ConfigMap:实现自定义配置文件
- 配置 Doris Secret:管理特殊密码
- 配置 Doris Service:使用 NodePort 对外发布 Doris 服务
- 部署 Doris FE
- 部署 Doris BE
- Doris 用户初始化
- Doris 图形化管理概览
通过本文的指导,您将掌握在 K8s 上部署 Compute storage coupled 模式下的 Doris 集群的必备技能。
实战服务器配置(架构1:1复刻小规模生产环境,配置略有不同)
| 主机名 | IP | CPU | 内存 | 系统盘 | 数据盘 | 用途 |
|---|---|---|---|---|---|---|
| ksp-registry | 192.168.9.90 | 4 | 8 | 40 | 200 | Harbor 镜像仓库 |
| ksp-control-1 | 192.168.9.91 | 4 | 8 | 40 | 100 | KubeSphere/k8s-control-plane |
| ksp-control-2 | 192.168.9.92 | 4 | 8 | 40 | 100 | KubeSphere/k8s-control-plane |
| ksp-control-3 | 192.168.9.93 | 4 | 8 | 40 | 100 | KubeSphere/k8s-control-plane |
| ksp-worker-1 | 192.168.9.94 | 8 | 16 | 40 | 100 | k8s-worker/CI |
| ksp-worker-2 | 192.168.9.95 | 8 | 16 | 40 | 100 | k8s-worker |
| ksp-worker-3 | 192.168.9.96 | 8 | 16 | 40 | 100 | k8s-worker |
| ksp-storage-1 | 192.168.9.97 | 4 | 8 | 40 | 400+ | ElasticSearch/Longhorn/Ceph/NFS |
| ksp-storage-2 | 192.168.9.98 | 4 | 8 | 40 | 300+ | ElasticSearch/Longhorn/Ceph |
| ksp-storage-3 | 192.168.9.99 | 4 | 8 | 40 | 300+ | ElasticSearch/Longhorn/Ceph |
| ksp-gpu-worker-1 | 192.168.9.101 | 4 | 16 | 40 | 100 | k8s-worker(GPU NVIDIA Tesla M40 24G) |
| ksp-gpu-worker-2 | 192.168.9.102 | 4 | 16 | 40 | 100 | k8s-worker(GPU NVIDIA Tesla P100 16G) |
| ksp-gateway-1 | 192.168.9.103 | 2 | 4 | 40 | 自建应用服务代理网关/VIP:192.168.9.100 | |
| ksp-gateway-2 | 192.168.9.104 | 2 | 4 | 40 | 自建应用服务代理网关/VIP:192.168.9.100 | |
| ksp-mid | 192.168.9.105 | 4 | 8 | 40 | 100 | 部署在 k8s 集群之外的服务节点(Gitlab 等) |
| 合计 | 15 | 68 | 152 | 600 | 2100+ |
实战环境涉及软件版本信息
- 操作系统:openEuler 22.03 LTS SP3 x86_64
- KubeSphere:v3.4.1
- Kubernetes:v1.28.8
- KubeKey: v3.1.1
- Doris: 3.0.2
1. 部署方案规划
Doris 官方提供了 Doris Operator 工具,用于在 K8s 集群中部署和管理 Doris 集群,详细信息可以查阅Doris 快速部署文档 。
一些特殊环境或是运维人员自身能力、喜好等原因,不适合使用 Doris Operator。这就需要我们使用 Kubectl 利用自定义资源清单,部署 Doris 集群。
本文基于资源清单实现了 Doris 集群的部署,生产环境建议使用 Doris Operator,部署方法也更加简单。
在 K8s 上部署 Doris 集群有两种架构方案:
- Compute storage coupled(存算耦合)
- Compute storage decoupled(存算分离)
本文选择了适用于中小规模场景的 Compute storage coupled 方案。Compute storage decoupled 的部署和维护更加复杂,更多细节请查阅官方文档。
1.1 部署架构图
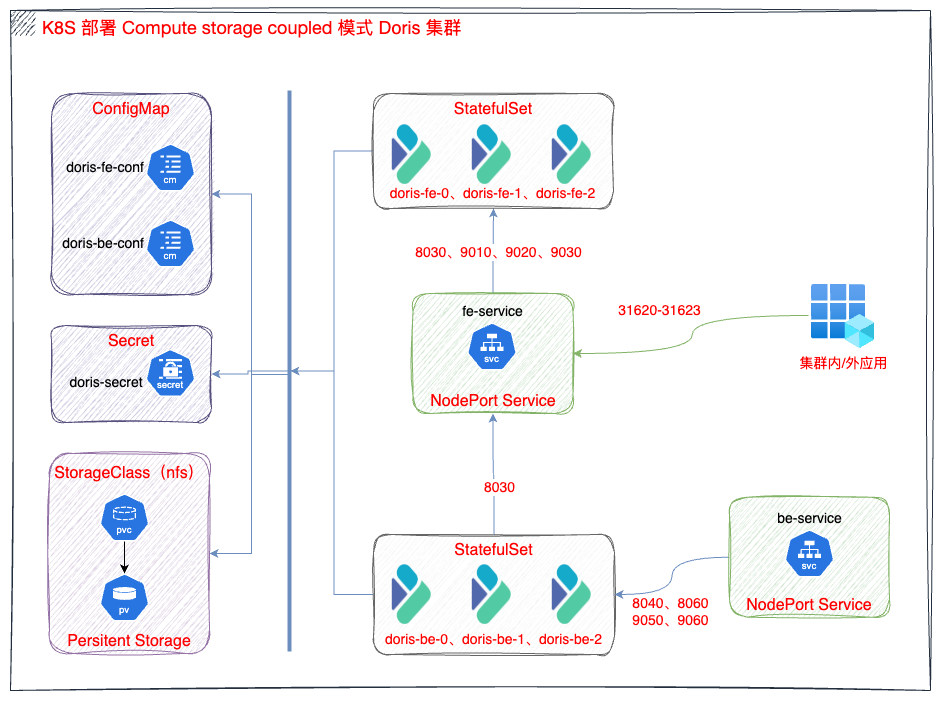
1.2 准备持久化存储
本实战环境使用 NFS 作为 K8s 集群的持久化存储,新集群可以参考探索 K8s 持久化存储之 NFS 终极实战指南 部署 NFS 存储。
1.3 命名空间
Doris 集群所有资源部署在命名空间 opsxlab内。
1.4 前提准备
- 准备 root 密码
编写 Python 脚本 hm.py,生成 2 阶段 SHA-1 加密的密码。
#!/bin/pythonimport hashlib# 原始密码
original_password = "PleaseChangeMe"# 第一次SHA-1哈希运算
first_hash = hashlib.sha1(original_password.encode('utf-8')).hexdigest()# 第二次SHA-1哈希运算
first_hash_bytes = bytes.fromhex(first_hash)
second_hash = hashlib.sha1(first_hash_bytes).hexdigest()# 输出两阶段加密后的密码
print("*" + second_hash)
生成密码,记录备用。
$ python3 hm.py
*aa7530f7c48740e92a4c0d2138324611e314d397
2. 部署 Doris 集群
2.1 创建 ConfigMap
- 创建 Doris FE 配置文件
请使用 vi 编辑器,创建资源清单文件 doris-cluster-fe-conf.yaml,并输入以下内容:
apiVersion: v1
kind: ConfigMap
metadata:name: doris-cluster-fe-conflabels:app.kubernetes.io/component: fe
data:fe.conf: |####################################################################### The uppercase properties are read and exported by bin/start_fe.sh.## To see all Frontend configurations,## see fe/src/org/apache/doris/common/Config.java#####################################################################CUR_DATE=`date +%Y%m%d-%H%M%S`# Log dirLOG_DIR = ${DORIS_HOME}/log# For jdk 8JAVA_OPTS="-Dfile.encoding=UTF-8 -Djavax.security.auth.useSubjectCredsOnly=false -Xss4m -Xmx8192m -XX:+UnlockExperimentalVMOptions -XX:+UseG1GC -XX:MaxGCPauseMillis=200 -XX:+PrintGCDateStamps -XX:+PrintGCDetails -Xloggc:$LOG_DIR/log/fe.gc.log.$CUR_DATE -XX:+UseGCLogFileRotation -XX:NumberOfGCLogFiles=10 -XX:GCLogFileSize=50M -Dlog4j2.formatMsgNoLookups=true"# For jdk 17, this JAVA_OPTS will be used as default JVM optionsJAVA_OPTS_FOR_JDK_17="-Dfile.encoding=UTF-8 -Djavax.security.auth.useSubjectCredsOnly=false -Xmx8192m -Xms8192m -XX:+HeapDumpOnOutOfMemoryError -XX:HeapDumpPath=$LOG_DIR -Xlog:gc*:$LOG_DIR/fe.gc.log.$CUR_DATE:time,uptime:filecount=10,filesize=50M --add-opens=java.base/java.nio=ALL-UNNAMED --add-opens java.base/jdk.internal.ref=ALL-UNNAMED"# Set your own JAVA_HOME# JAVA_HOME=/path/to/jdk/#### the lowercase properties are read by main program.### store metadata, must be created before start FE.# Default value is ${DORIS_HOME}/doris-meta# meta_dir = ${DORIS_HOME}/doris-meta# Default dirs to put jdbc drivers,default value is ${DORIS_HOME}/jdbc_drivers# jdbc_drivers_dir = ${DORIS_HOME}/jdbc_drivershttp_port = 8030rpc_port = 9020query_port = 9030edit_log_port = 9010arrow_flight_sql_port = -1# Choose one if there are more than one ip except loopback address.# Note that there should at most one ip match this list.# If no ip match this rule, will choose one randomly.# use CIDR format, e.g. 10.10.10.0/24 or IP format, e.g. 10.10.10.1# Default value is empty.# priority_networks = 10.10.10.0/24;192.168.0.0/16# Advanced configurations# log_roll_size_mb = 1024# INFO, WARN, ERROR, FATALsys_log_level = INFO# NORMAL, BRIEF, ASYNCsys_log_mode = ASYNC# sys_log_roll_num = 10# sys_log_verbose_modules = org.apache.doris# audit_log_dir = $LOG_DIR# audit_log_modules = slow_query, query# audit_log_roll_num = 10# meta_delay_toleration_second = 10# qe_max_connection = 1024# qe_query_timeout_second = 300# qe_slow_log_ms = 5000enable_fqdn_mode = trueinitial_root_password = *aa7530f7c48740e92a4c0d2138324611e314d397
说明: 配置文件在 FE 默认配置基础上,增加了 initial_root_password 配置项,值是前面用 Python 生成的2段加密的密码,生产环境请根据需要调整。
- 创建 Doris BE 配置文件
请使用 vi 编辑器,创建资源清单文件 doris-cluster-be-conf.yaml,并输入以下内容:
kind: ConfigMap
apiVersion: v1
metadata:name: doris-cluster-be-conflabels:app.kubernetes.io/component: be
data:be.conf: >CUR_DATE=`date +%Y%m%d-%H%M%S`# Log dirLOG_DIR="${DORIS_HOME}/log/"# For jdk 8JAVA_OPTS="-Dfile.encoding=UTF-8 -Xmx2048m -DlogPath=$LOG_DIR/jni.log -Xloggc:$LOG_DIR/be.gc.log.$CUR_DATE -XX:+UseGCLogFileRotation -XX:NumberOfGCLogFiles=10 -XX:GCLogFileSize=50M -Djavax.security.auth.useSubjectCredsOnly=false -Dsun.security.krb5.debug=true -Dsun.java.command=DorisBE -XX:-CriticalJNINatives"# For jdk 17, this JAVA_OPTS will be used as default JVM optionsJAVA_OPTS_FOR_JDK_17="-Dfile.encoding=UTF-8 -Xmx2048m -DlogPath=$LOG_DIR/jni.log -Xlog:gc*:$LOG_DIR/be.gc.log.$CUR_DATE:time,uptime:filecount=10,filesize=50M -Djavax.security.auth.useSubjectCredsOnly=false -Dsun.security.krb5.debug=true -Dsun.java.command=DorisBE -XX:-CriticalJNINatives -XX:+IgnoreUnrecognizedVMOptions --add-opens=java.base/java.lang=ALL-UNNAMED --add-opens=java.base/java.lang.invoke=ALL-UNNAMED --add-opens=java.base/java.lang.reflect=ALL-UNNAMED --add-opens=java.base/java.io=ALL-UNNAMED --add-opens=java.base/java.net=ALL-UNNAMED --add-opens=java.base/java.nio=ALL-UNNAMED --add-opens=java.base/java.util=ALL-UNNAMED --add-opens=java.base/java.util.concurrent=ALL-UNNAMED --add-opens=java.base/java.util.concurrent.atomic=ALL-UNNAMED --add-opens=java.base/sun.nio.ch=ALL-UNNAMED --add-opens=java.base/sun.nio.cs=ALL-UNNAMED --add-opens=java.base/sun.security.action=ALL-UNNAMED --add-opens=java.base/sun.util.calendar=ALL-UNNAMED --add-opens=java.security.jgss/sun.security.krb5=ALL-UNNAMED --add-opens=java.management/sun.management=ALL-UNNAMED"# Set your own JAVA_HOME# JAVA_HOME=/path/to/jdk/# https://github.com/apache/doris/blob/master/docs/zh-CN/community/developer-guide/debug-tool.md#jemalloc-heap-profile# https://jemalloc.net/jemalloc.3.htmlJEMALLOC_CONF="percpu_arena:percpu,background_thread:true,metadata_thp:auto,muzzy_decay_ms:15000,dirty_decay_ms:15000,oversize_threshold:0,prof:false,lg_prof_interval:32,lg_prof_sample:19,prof_gdump:false,prof_accum:false,prof_leak:false,prof_final:false"JEMALLOC_PROF_PRFIX=""# ports for admin, web, heartbeat servicebe_port = 9060webserver_port = 8040heartbeat_service_port = 9050brpc_port = 8060arrow_flight_sql_port = -1# HTTPS configuresenable_https = false# path of certificate in PEM format.ssl_certificate_path = "$DORIS_HOME/conf/cert.pem"# path of private key in PEM format.ssl_private_key_path = "$DORIS_HOME/conf/key.pem"# Choose one if there are more than one ip except loopback address.# Note that there should at most one ip match this list.# If no ip match this rule, will choose one randomly.# use CIDR format, e.g. 10.10.10.0/24 or IP format, e.g. 10.10.10.1# Default value is empty.# priority_networks = 10.10.10.0/24;192.168.0.0/16# data root path, separate by ';'# You can specify the storage type for each root path, HDD (cold data) or SSD (hot data)# eg:# storage_root_path = /home/disk1/doris;/home/disk2/doris;/home/disk2/doris# storage_root_path = /home/disk1/doris,medium:SSD;/home/disk2/doris,medium:SSD;/home/disk2/doris,medium:HDD# /home/disk2/doris,medium:HDD(default)## you also can specify the properties by setting '<property>:<value>', separate by ','# property 'medium' has a higher priority than the extension of path## Default value is ${DORIS_HOME}/storage, you should create it by hand.# storage_root_path = ${DORIS_HOME}/storage# Default dirs to put jdbc drivers,default value is ${DORIS_HOME}/jdbc_drivers# jdbc_drivers_dir = ${DORIS_HOME}/jdbc_drivers# Advanced configurations# INFO, WARNING, ERROR, FATALsys_log_level = INFO# sys_log_roll_mode = SIZE-MB-1024# sys_log_roll_num = 10# sys_log_verbose_modules = *# log_buffer_level = -1# aws sdk log level#    Off = 0,#    Fatal = 1,#    Error = 2,#    Warn = 3,#    Info = 4,#    Debug = 5,#    Trace = 6# Default to turn off aws sdk log, because aws sdk errors that need to be cared will be output through Doris logsaws_log_level=0## If you are not running in aws cloud, you can disable EC2 metadataAWS_EC2_METADATA_DISABLED=true
说明: 配置文件使用了 BE 的默认配置,生产环境请根据需要调整。
- 创建资源
执行下面的命令,创建资源。
kubectl apply -f doris-cluster-fe-conf.yaml -n opsxlab
kubectl apply -f doris-cluster-be-conf.yaml -n opsxlab- 验证资源
执行下面的命令,查看创建结果。
$ kubectl get cm -n opsxlab
NAME                    DATA   AGE
doris-cluster-be-conf   1      34s
doris-cluster-fe-conf   1      20s
2.2 创建 Secret
- 创建管理 Doris 集群节点所需的用户名、密码的保密字典
请使用 vi 编辑器,创建资源清单文件 doris-cluster-secret.yaml,并输入以下内容:
kind: Secret
apiVersion: v1
metadata:name: doris-cluster-secret
stringData:username: rootpassword: PleaseChangeMe
type: kubernetes.io/basic-auth
提示: 密码使用明文 PleaseChangeMe,生产环境请务必替换。
- 创建资源
执行下面的命令,创建资源。
kubectl apply -f doris-cluster-secret.yaml -n opsxlab- 验证资源
执行下面的命令,查看创建结果。
$ kubectl get secret -n opsxlab
NAME                   TYPE                       DATA   AGE
doris-cluster-secret   kubernetes.io/basic-auth   2      22s
2.3 创建服务
我们采用 NodePort 方式在 K8s 集群外发布 Doris 服务。
- FE 服务
请使用 vi 编辑器,创建资源清单文件 doris-cluster-fe-service.yaml,并输入以下内容:
kind: Service
apiVersion: v1
metadata:name: doris-cluster-fe-servicelabels:app.kubernetes.io/component: doris-cluster-fe
spec:ports:- name: http-portprotocol: TCPport: 8030targetPort: 8030nodePort: 31620- name: rpc-portprotocol: TCPport: 9020targetPort: 9020nodePort: 31621- name: query-portprotocol: TCPport: 9030targetPort: 9030nodePort: 31622- name: edit-log-portprotocol: TCPport: 9010targetPort: 9010nodePort: 31623selector:app.kubernetes.io/component: doris-cluster-fetype: NodePort- BE 服务
请使用 vi 编辑器,创建资源清单文件 doris-cluster-be-service.yaml,并输入以下内容:
kind: Service
apiVersion: v1
metadata:name: doris-cluster-be-servicelabels:app.kubernetes.io/component: doris-cluster-be
spec:ports:- name: be-portprotocol: TCPport: 9060targetPort: 9060nodePort: 32189- name: webserver-portprotocol: TCPport: 8040targetPort: 8040nodePort: 31624- name: heartbeat-portprotocol: TCPport: 9050targetPort: 9050nodePort: 31625- name: brpc-portprotocol: TCPport: 8060targetPort: 8060nodePort: 31627selector:app.kubernetes.io/component: doris-cluster-betype: NodePort- 创建资源
执行下面的命令,创建资源。
kubectl apply -f doris-cluster-fe-service.yaml -n opsxlab
kubectl apply -f doris-cluster-be-service.yaml -n opsxlab- 验证资源
执行下面的命令,查看创建结果。
$ kubectl get svc -o wide -n opsxlab
NAME                        TYPE        CLUSTER-IP      EXTERNAL-IP   PORT(S)                                                       AGE   SELECTOR
doris-cluster-be-service    NodePort    10.233.11.255   <none>        9060:32189/TCP,8040:31624/TCP,9050:31625/TCP,8060:31627/TCP   12s   app.kubernetes.io/component=doris-cluster-be
doris-cluster-fe-service    NodePort    10.233.60.147   <none>        8030:31620/TCP,9020:31621/TCP,9030:31622/TCP,9010:31623/TCP   12s   app.kubernetes.io/component=doris-cluster-fe
2.4 创建 Doris FE
使用 StatefulSet 部署 Doris FE 服务,需要创建 StatefulSet 和 HeadLess 两种资源。
- 创建资源清单
请使用 vi 编辑器,创建资源清单文件 doris-cluster-fe-sts.yaml,并输入以下内容:
kind: StatefulSet
apiVersion: apps/v1
metadata:name: doris-cluster-felabels:app.kubernetes.io/component: doris-cluster-fe
spec:replicas: 3selector:matchLabels:app.kubernetes.io/component: doris-cluster-fetemplate:metadata:name: doris-cluster-felabels:app.kubernetes.io/component: doris-cluster-fespec:volumes:- name: metapersistentVolumeClaim:claimName: meta- name: podinfodownwardAPI:items:- path: labelsfieldRef:apiVersion: v1fieldPath: metadata.labels- path: annotationsfieldRef:apiVersion: v1fieldPath: metadata.annotationsdefaultMode: 420- name: basic-authsecret:secretName: doris-cluster-secretdefaultMode: 420- name: doris-cluster-fe-confconfigMap:name: doris-cluster-fe-confdefaultMode: 420containers:- name: doris-cluster-feimage: 'selectdb/doris.fe-ubuntu:3.0.2'command:- /opt/apache-doris/fe_entrypoint.shargs:- $(ENV_FE_ADDR)ports:- name: http-portcontainerPort: 8030protocol: TCP- name: rpc-portcontainerPort: 9020protocol: TCP- name: query-portcontainerPort: 9030protocol: TCP- name: edit-log-portcontainerPort: 9010protocol: TCPenv:- name: POD_NAMEvalueFrom:fieldRef:apiVersion: v1fieldPath: metadata.name- name: POD_IPvalueFrom:fieldRef:apiVersion: v1fieldPath: status.podIP- name: HOST_IPvalueFrom:fieldRef:apiVersion: v1fieldPath: status.hostIP- name: POD_NAMESPACEvalueFrom:fieldRef:apiVersion: v1fieldPath: metadata.namespace- name: CONFIGMAP_MOUNT_PATHvalue: /etc/doris- name: USERvalue: root- name: DORIS_ROOTvalue: /opt/apache-doris- name: ENV_FE_ADDRvalue: doris-cluster-fe-service- name: FE_QUERY_PORTvalue: '9030'- name: ELECT_NUMBERvalue: '3'resources:limits:cpu: '8'memory: 16Girequests:cpu: '1'memory: 1GivolumeMounts:- name: podinfomountPath: /etc/podinfo- name: logmountPath: /opt/apache-doris/fe/log- name: metamountPath: /opt/apache-doris/fe/doris-meta- name: doris-cluster-fe-confmountPath: /etc/doris- name: basic-authmountPath: /etc/basic_authlivenessProbe:tcpSocket:port: 9030initialDelaySeconds: 80timeoutSeconds: 180periodSeconds: 5successThreshold: 1failureThreshold: 3readinessProbe:httpGet:path: /api/healthport: 8030scheme: HTTPtimeoutSeconds: 1periodSeconds: 5successThreshold: 1failureThreshold: 3startupProbe:tcpSocket:port: 9030timeoutSeconds: 1periodSeconds: 5successThreshold: 1failureThreshold: 60lifecycle:preStop:exec:command:- /opt/apache-doris/fe_prestop.shterminationMessagePath: /dev/termination-logterminationMessagePolicy: FileimagePullPolicy: IfNotPresentrestartPolicy: AlwaysterminationGracePeriodSeconds: 30dnsPolicy: ClusterFirstsecurityContext: {}affinity:podAntiAffinity:preferredDuringSchedulingIgnoredDuringExecution:- weight: 100podAffinityTerm:labelSelector:matchExpressions:- key: app.kubernetes.io/componentoperator: Invalues:- doris-cluster-fetopologyKey: kubernetes.io/hostnameschedulerName: default-schedulervolumeClaimTemplates:- kind: PersistentVolumeClaimapiVersion: v1metadata:name: metaspec:accessModes:- ReadWriteOnceresources:requests:storage: 10GstorageClassName: nfs-scvolumeMode: Filesystem- kind: PersistentVolumeClaimapiVersion: v1metadata:name: logspec:accessModes:- ReadWriteOnceresources:requests:storage: '10'storageClassName: nfs-scvolumeMode: FilesystemserviceName: doris-cluster-fe-internalpodManagementPolicy: Parallel---
kind: Service
apiVersion: v1
metadata:name: doris-cluster-fe-internallabels:app.kubernetes.io/component: doris-cluster-fe
spec:ports:- name: query-portprotocol: TCPport: 9030targetPort: 9030selector:app.kubernetes.io/component: doris-cluster-feclusterIP: Nonetype: ClusterIP- 创建资源
执行下面的命令,创建资源。
kubectl apply -f doris-cluster-fe-sts.yaml -n opsxlab- 验证资源
执行下面的命令,查看创建结果(初次创建比较慢)。
$ kubectl get sts,pod -n opsxlab
NAME                                READY   AGE
statefulset.apps/doris-cluster-fe   3/3     117sNAME                     READY   STATUS    RESTARTS   AGE
pod/doris-cluster-fe-0   1/1     Running   0          117s
pod/doris-cluster-fe-1   1/1     Running   0          96s
pod/doris-cluster-fe-2   1/1     Running   0          80s
2.5 创建 Doris BE
使用 StatefulSet 部署 Doris BE 服务,需要创建 StatefulSet 和 HeadLess 两种资源。
- 创建资源清单
请使用 vi 编辑器,创建资源清单文件 doris-cluster-be-sts.yaml,并输入以下内容:
kind: StatefulSet
apiVersion: apps/v1
metadata:name: doris-cluster-belabels:app.kubernetes.io/component: doris-cluster-be
spec:replicas: 3selector:matchLabels:app.kubernetes.io/component: doris-cluster-betemplate:metadata:name: doris-cluster-belabels:app.kubernetes.io/component: doris-cluster-bespec:volumes:- name: podinfodownwardAPI:items:- path: labelsfieldRef:apiVersion: v1fieldPath: metadata.labels- path: annotationsfieldRef:apiVersion: v1fieldPath: metadata.annotationsdefaultMode: 420- name: basic-authsecret:secretName: doris-cluster-secretdefaultMode: 420- name: doris-cluster-be-confconfigMap:name: doris-cluster-be-confdefaultMode: 420initContainers:- name: default-initimage: 'selectdb/alpine:latest'command:- /bin/shargs:- '-c'- sysctl -w vm.max_map_count=2000000 && swapoff -aresources: {}terminationMessagePath: /dev/termination-logterminationMessagePolicy: FileimagePullPolicy: IfNotPresentsecurityContext:privileged: truecontainers:- name: beimage: 'selectdb/doris.be-ubuntu:3.0.2'command:- /opt/apache-doris/be_entrypoint.shargs:- $(ENV_FE_ADDR)ports:- name: be-portcontainerPort: 9060protocol: TCP- name: webserver-portcontainerPort: 8040protocol: TCP- name: heartbeat-portcontainerPort: 9050protocol: TCP- name: brpc-portcontainerPort: 8060protocol: TCPenv:- name: POD_NAMEvalueFrom:fieldRef:apiVersion: v1fieldPath: metadata.name- name: POD_IPvalueFrom:fieldRef:apiVersion: v1fieldPath: status.podIP- name: HOST_IPvalueFrom:fieldRef:apiVersion: v1fieldPath: status.hostIP- name: POD_NAMESPACEvalueFrom:fieldRef:apiVersion: v1fieldPath: metadata.namespace- name: CONFIGMAP_MOUNT_PATHvalue: /etc/doris- name: USERvalue: root- name: DORIS_ROOTvalue: /opt/apache-doris- name: ENV_FE_ADDRvalue: doris-cluster-fe-service- name: FE_QUERY_PORTvalue: '9030'resources:limits:cpu: '8'memory: 16Girequests:cpu: '1'memory: 1GivolumeMounts:- name: podinfomountPath: /etc/podinfo- name: be-storagemountPath: /opt/apache-doris/be/storage- name: be-logmountPath: /opt/apache-doris/be/log- name: doris-cluster-be-confmountPath: /etc/doris- name: basic-authmountPath: /etc/basic_authlivenessProbe:tcpSocket:port: 9050initialDelaySeconds: 80timeoutSeconds: 180periodSeconds: 5successThreshold: 1failureThreshold: 3readinessProbe:httpGet:path: /api/healthport: 8040scheme: HTTPtimeoutSeconds: 1periodSeconds: 5successThreshold: 1failureThreshold: 3startupProbe:tcpSocket:port: 9050timeoutSeconds: 1periodSeconds: 5successThreshold: 1failureThreshold: 60lifecycle:preStop:exec:command:- /opt/apache-doris/be_prestop.shterminationMessagePath: /dev/termination-logterminationMessagePolicy: FileimagePullPolicy: IfNotPresentrestartPolicy: AlwaysterminationGracePeriodSeconds: 30dnsPolicy: ClusterFirstsecurityContext: {}affinity:podAntiAffinity:preferredDuringSchedulingIgnoredDuringExecution:- weight: 100podAffinityTerm:labelSelector:matchExpressions:- key: app.kubernetes.io/componentoperator: Invalues:- doris-cluster-betopologyKey: kubernetes.io/hostnameschedulerName: default-schedulervolumeClaimTemplates:- kind: PersistentVolumeClaimapiVersion: v1metadata:name: be-storagespec:accessModes:- ReadWriteOnceresources:requests:storage: '10'storageClassName: nfs-scvolumeMode: Filesystem- kind: PersistentVolumeClaimapiVersion: v1metadata:name: be-logspec:accessModes:- ReadWriteOnceresources:requests:storage: '10'storageClassName: nfs-scvolumeMode: FilesystemserviceName: doris-cluster-be-internalpodManagementPolicy: Parallel---
kind: Service
apiVersion: v1
metadata:name: doris-cluster-be-internallabels:app.kubernetes.io/component: doris-cluster-be-internal
spec:ports:- name: heartbeat-portprotocol: TCPport: 9050targetPort: 9050selector:app.kubernetes.io/component: doris-cluster-beclusterIP: Nonetype: ClusterIP- 创建资源
执行下面的命令,创建资源。
kubectl apply -f doris-cluster-be-sts.yaml -n opsxlab- 验证资源
执行下面的命令,查看创建结果。
$ kubectl get sts,pod -n opsxlab
NAME                                READY   AGE
statefulset.apps/doris-cluster-be   3/3     37s
statefulset.apps/doris-cluster-fe   3/3     12mNAME                     READY   STATUS    RESTARTS      AGE
pod/doris-cluster-be-0   1/1     Running   0             37s
pod/doris-cluster-be-1   1/1     Running   0             37s
pod/doris-cluster-be-2   1/1     Running   0             37s
pod/doris-cluster-fe-0   1/1     Running   0             13m
pod/doris-cluster-fe-1   1/1     Running   0             13m
pod/doris-cluster-fe-2   1/1     Running   0             12m
3. 认证管理
登录 Doris 查看用户信息并设置密码。
- 执行下面的命令,进入 Pod
doris-fe-0的终端,连接 Doris 服务。
kubectl exec -n opsxlab -it doris-cluster-fe-0 -- /bin/bash- 在
doris-fe-0内,执行 mysql 命令,使用 root 用户访问 Doris 服务对应的 NodePort 端口(需要密码),并查看用户及权限。
root@doris-cluster-fe-0:/opt/apache-doris# mysql -uroot -P31622 -h192.168.9.91 -p
Enter password:
Welcome to the MySQL monitor.  Commands end with ; or \g.
Your MySQL connection id is 654
Server version: 5.7.99Copyright (c) 2000, 2024, Oracle and/or its affiliates.Oracle is a registered trademark of Oracle Corporation and/or its
affiliates. Other names may be trademarks of their respective
owners.Type 'help;' or '\h' for help. Type '\c' to clear the current input statement.mysql> SHOW ALL GRANTS\G;
*************************** 1. row ***************************UserIdentity: 'root'@'%'Comment: ROOTPassword: YesRoles: operatorGlobalPrivs: Node_priv,Admin_privCatalogPrivs: NULLDatabasePrivs: internal.information_schema: Select_priv; internal.mysql: Select_privTablePrivs: NULLColPrivs: NULLResourcePrivs: NULLCloudClusterPrivs: NULLCloudStagePrivs: NULLStorageVaultPrivs: NULL
WorkloadGroupPrivs: normal: Usage_privComputeGroupPrivs: NULL
*************************** 2. row ***************************UserIdentity: 'admin'@'%'Comment: ADMINPassword: NoRoles: adminGlobalPrivs: Admin_privCatalogPrivs: NULLDatabasePrivs: internal.information_schema: Select_priv; internal.mysql: Select_privTablePrivs: NULLColPrivs: NULLResourcePrivs: NULLCloudClusterPrivs: NULLCloudStagePrivs: NULLStorageVaultPrivs: NULL
WorkloadGroupPrivs: normal: Usage_privComputeGroupPrivs: NULL
2 rows in set (0.05 sec)ERROR:
No query specified
提示:输出结果显示 root 用户设置了密码,admin 用户没有设置密码。
- 执行 mysql 命令,使用 admin 用户登录 Doris(无需密码)
root@doris-cluster-fe-0:/opt/apache-doris# mysql -uadmin -P31622 -h192.168.9.91
Welcome to the MySQL monitor.  Commands end with ; or \g.
Your MySQL connection id is 680
Server version: 5.7.99 Doris version doris-3.0.2-rc03-c21b9f5bceCopyright (c) 2000, 2024, Oracle and/or its affiliates.Oracle is a registered trademark of Oracle Corporation and/or its
affiliates. Other names may be trademarks of their respective
owners.Type 'help;' or '\h' for help. Type '\c' to clear the current input statement.mysql>- 请立即为管理员(admin)账户设置密码。
SET PASSWORD FOR 'admin'@'%' = PASSWORD('PleaseChangeMe');- 再次查看权限,admin 用户的 Password 项的值已经变成 Yes。
mysql> SHOW ALL GRANTS\G;
*************************** 2. row ***************************UserIdentity: 'admin'@'%'Comment: ADMINPassword: YesRoles: adminGlobalPrivs: Admin_privCatalogPrivs: NULLDatabasePrivs: internal.information_schema: Select_priv; internal.mysql: Select_privTablePrivs: NULLColPrivs: NULLResourcePrivs: NULLCloudClusterPrivs: NULLCloudStagePrivs: NULLStorageVaultPrivs: NULL
WorkloadGroupPrivs: normal: Usage_privComputeGroupPrivs: NULL
2 rows in set (0.01 sec)
退出 MySQL 控制台,再次使用 admin 用户登录,不输入密码,提示权限拒绝。
root@doris-cluster-fe-0:/opt/apache-doris# mysql -uadmin -P31622 -h192.168.9.91
ERROR 1045 (28000): Access denied for user 'admin@10.233.93.0' (using password: NO)
再次使用 admin 用户登录,输入密码,可以登录 Doris 系统。
root@doris-cluster-fe-0:/opt/apache-doris# mysql -uadmin -P31622 -h192.168.9.91 -p
Enter password:
Welcome to the MySQL monitor.  Commands end with ; or \g.
Your MySQL connection id is 719
Server version: 5.7.99 Doris version doris-3.0.2-rc03-c21b9f5bceCopyright (c) 2000, 2024, Oracle and/or its affiliates.Oracle is a registered trademark of Oracle Corporation and/or its
affiliates. Other names may be trademarks of their respective
owners.Type 'help;' or '\h' for help. Type '\c' to clear the current input statement.mysql>
4. Doris 图形化功能概览
Doris FE 内置 Web UI。用户无须安装 MySQL 客户端,即可通过内置的 Web UI 进行 SQL 查询和其它相关信息的查看。
使用浏览器,打开 FE 服务 http-port 端口 8030 对应的 NodePort 31620,例如 http://192.168.9.91:31620,打开 Doris 内置的 Web 控制台。
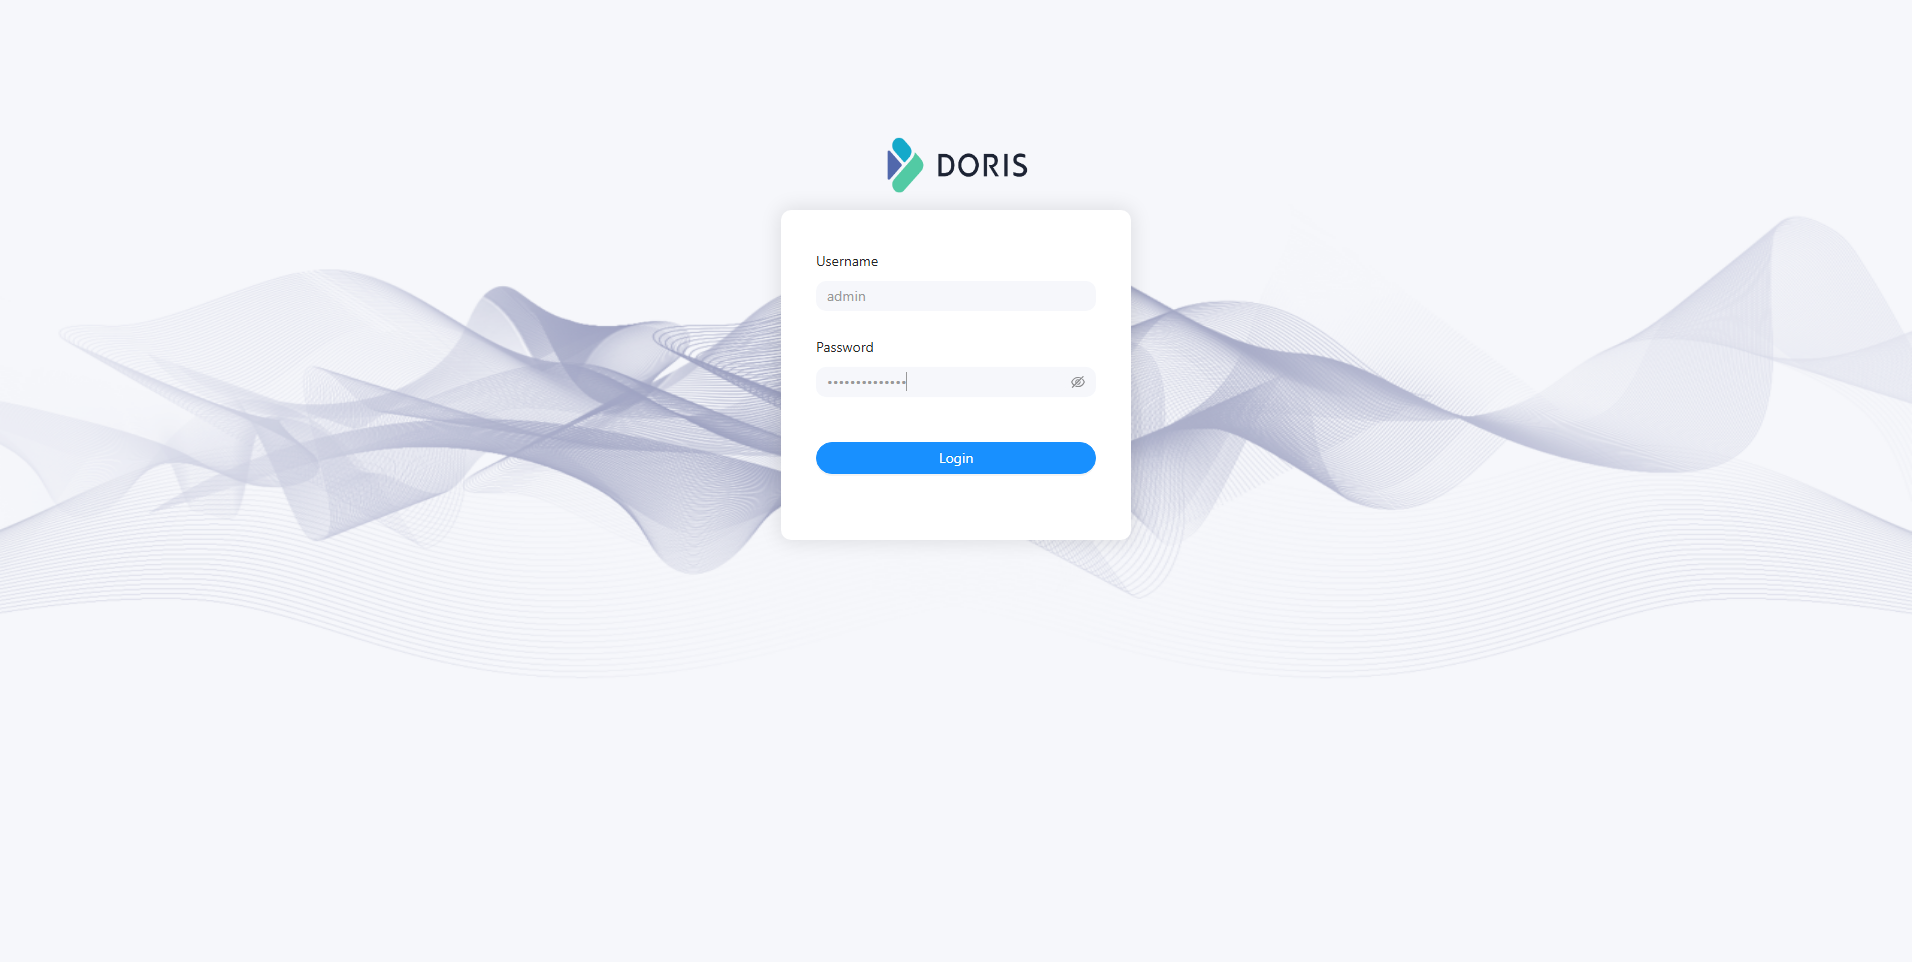
- 登录页面
输入用户名 admin 及密码,点击「Login」登录系统。
- Home
- Playground

- System

- Log

- QueryProfile

- Session
- Configuration

以上,就是我今天分享的全部内容。
免责声明:
- 笔者水平有限,尽管经过多次验证和检查,尽力确保内容的准确性,但仍可能存在疏漏之处。敬请业界专家大佬不吝指教。
- 本文所述内容仅通过实战环境验证测试,读者可学习、借鉴,但严禁直接用于生产环境。由此引发的任何问题,作者概不负责!
本文由博客一文多发平台 OpenWrite 发布!