东莞企业网站建设盐酸达泊西汀片是治疗什么的药物
一、springboot的特性之一
基于springboot的特性 自动装配@Configuretion 注解
二、springboot内置Tomcat步骤
直接看SpringApplication方法的代码块
总纲:
1、在SpringApplication.run 初始化了一个上下文ConfigurableApplicationContext configurableApplicationContext = AnnotationConfigServletWebServerApplicationContext,这里是通过Class.forName获取到的。
2、在调用AbstartApplicationContext中调用了onRefresh()方法。
3、继承onRefresh()有5个子类
...
ServletWebServerApplicationContext
..
4、为什么说是在ServletWebServerApplicationContext实现的呢。
5、可以去查看AnnotationConfigServletWebServerApplicationContext这个类是继承那个类。可以看到,这个类继承了ServletWebServerApplicationContext,而onRefresh()方法在ServletWebServerApplicationContext实现了。衔接
6、在这个createWebServer()方法中。获取一个ServletWebServerFactory,创建一个服务生成工厂;而这里就比较有意思。这里是通过自动装配,ServletWebServerFactoryAutoConfiguretion;在这里创建了具体服务的工厂。
7、而我们引入spring-boot-starter的时候,依赖的spring-boot-starter-web中依赖的spring-boot-starter-tomcat; 所以在自动装配创建的TomcatServletWebServiceFactory;在这里个工厂中创建WebServer,也就是Tomcat;
8、既然Tomcat已经创建了,那么怎么跟SpringMvc中的DispatherServlet进行关联呢?第三章。
// 1、第一步从SpringAppplicaton.run开始
/*** Static helper that can be used to run a {@link SpringApplication} from the* specified source using default settings.* @param primarySource the primary source to load* @param args the application arguments (usually passed from a Java main method)* @return the running {@link ApplicationContext}*/
public static ConfigurableApplicationContext run(Class<?> primarySource, String... args) {return run(new Class<?>[] { primarySource }, args);
}
// ....中间的就省略
// 第二步
try {ApplicationArguments applicationArguments = new DefaultApplicationArguments(args);ConfigurableEnvironment environment = prepareEnvironment(listeners, applicationArguments);configureIgnoreBeanInfo(environment);Banner printedBanner = printBanner(environment);context = createApplicationContext();exceptionReporters = getSpringFactoriesInstances(SpringBootExceptionReporter.class,new Class[] { ConfigurableApplicationContext.class }, context);prepareContext(context, environment, listeners, applicationArguments, printedBanner);// 从这里进入refreshContext(context);afterRefresh(context, applicationArguments);stopWatch.stop();if (this.logStartupInfo) {new StartupInfoLogger(this.mainApplicationClass).logStarted(getApplicationLog(), stopWatch);}listeners.started(context);callRunners(context, applicationArguments);
}
catch (Throwable ex) {handleRunFailure(context, ex, exceptionReporters, listeners);throw new IllegalStateException(ex);
}// 第三步
private void refreshContext(ConfigurableApplicationContext context) {
// 看这里
refresh(context);
if (this.registerShutdownHook) {try {context.registerShutdownHook();}catch (AccessControlException ex) {// Not allowed in some environments.}
}
}
查看refresh(context) 在使用ApplicationContext 类贯彻整条启动的链路 AbstratApplicationContext
而AnnotationConfigServletWebServerApplicationContext继承了SerlvetWebServerApplicationContext
所以在onRefresh(), 是使用SerlvetWebServerApplicationContext
try {// Allows post-processing of the bean factory in context subclasses.postProcessBeanFactory(beanFactory);// Invoke factory processors registered as beans in the context.invokeBeanFactoryPostProcessors(beanFactory);// Register bean processors that intercept bean creation.registerBeanPostProcessors(beanFactory);// Initialize message source for this context.initMessageSource();// Initialize event multicaster for this context.initApplicationEventMulticaster();// Initialize other special beans in specific context subclasses.// 在这里做内置Tomcat的内置,及加载到spring容器中。// 在这里实现一些自定义的实现。onRefresh();// Check for listener beans and register them.registerListeners();// Instantiate all remaining (non-lazy-init) singletons.finishBeanFactoryInitialization(beanFactory);// Last step: publish corresponding event.finishRefresh();}// 父类什么都没有?
// 那就看下父类有哪些实现了? 但这里是怎么实现在子类实现的?
// 子类里面是怎么关联到tomcat上的?
// 在
// 这里描述下为什么选择SerlvetWebServerApplicationContext
// 那是因为在启动创建spring的上下文的,AnnotationConfigServletWebServerApplicationContext
// 而AnnotationConfigServletWebServerApplicationContext继承了SerlvetWebServerApplicationContext
// 所以在onRefresh(), 是使用SerlvetWebServerApplicationContext
protected ConfigurableApplicationContext createApplicationContext() {Class<?> contextClass = this.applicationContextClass;if (contextClass == null) {try {switch (this.webApplicationType) {case SERVLET:// 这里创建的是org.springframework.boot.web.servlet.context.AnnotationConfigServletWebServerApplicationContextcontextClass = Class.forName(DEFAULT_SERVLET_WEB_CONTEXT_CLASS);break;case REACTIVE:contextClass = Class.forName(DEFAULT_REACTIVE_WEB_CONTEXT_CLASS);break;default:contextClass = Class.forName(DEFAULT_CONTEXT_CLASS);}}catch (ClassNotFoundException ex) {throw new IllegalStateException("Unable create a default ApplicationContext, please specify an ApplicationContextClass", ex);}}return (ConfigurableApplicationContext) BeanUtils.instantiateClass(contextClass);}
在SerlvetWebServerApplicationContext实现了onRefresh()方法
@Override
protected void onRefresh() {super.onRefresh();try {// 在这里创建一个web服务,先看代码createWebServer();}catch (Throwable ex) {throw new ApplicationContextException("Unable to start web server", ex);}
}//  创建web服务
private void createWebServer() {WebServer webServer = this.webServer;ServletContext servletContext = getServletContext();// 如果已经创建为了web服务,这里就不在创建,但是服务刚启动,肯定都是==nullif (webServer == null && servletContext == null) {// 这里获取一个创建服务的工厂。这里就很有意思。这里用的springboot自动装配ServletWebServerFactory factory = getWebServerFactory();this.webServer = factory.getWebServer(getSelfInitializer());}else if (servletContext != null) {try {getSelfInitializer().onStartup(servletContext);}catch (ServletException ex) {throw new ApplicationContextException("Cannot initialize servlet context", ex);}}initPropertySources();
}// 在容器中获取ServletWebServerFactory。 而这个类的子类是有三个
// 1、TomcatServletWebServerFactory (默认spring-boot-starter-web,依赖spring-boot-starter-tomcat)
// 2、JettyServletWebServerFactory
// 3、UndertowServletWebServerFactory
/*** Returns the {@link ServletWebServerFactory} that should be used to create the* embedded {@link WebServer}. By default this method searches for a suitable bean in* the context itself.* @return a {@link ServletWebServerFactory} (never {@code null})*/protected ServletWebServerFactory getWebServerFactory() {// Use bean names so that we don't consider the hierarchyString[] beanNames = getBeanFactory().getBeanNamesForType(ServletWebServerFactory.class);if (beanNames.length == 0) {throw new ApplicationContextException("Unable to start ServletWebServerApplicationContext due to missing "+ "ServletWebServerFactory bean.");}if (beanNames.length > 1) {throw new ApplicationContextException("Unable to start ServletWebServerApplicationContext due to multiple "+ "ServletWebServerFactory beans : " + StringUtils.arrayToCommaDelimitedString(beanNames));}return getBeanFactory().getBean(beanNames[0], ServletWebServerFactory.class);}// 从头看起,我们在第一章的时候也说明了。这里用到springboot的自动装配。
// 这里要从@EnableAutoConfiguration ; 而这个注解是在@SpringBootApplication中引用
// 自动装备会读取starter注解下spring-factory中加载。
// 而创建服务工厂是ServletWebServerFactoryAutoConfiguration这个配置类
/*** {@link EnableAutoConfiguration Auto-configuration} for servlet web servers.** @author Phillip Webb* @author Dave Syer* @author Ivan Sopov* @author Brian Clozel* @author Stephane Nicoll* @since 2.0.0*/
@Configuration(proxyBeanMethods = false)
@AutoConfigureOrder(Ordered.HIGHEST_PRECEDENCE)
// 这个配置类生效,必须是有ServletRequest这个类
@ConditionalOnClass(ServletRequest.class)
@ConditionalOnWebApplication(type = Type.SERVLET)
// 注入ServerProperties属性进来, 这是server服务的配置项。
// 端口。超时情况。在第四会详情介绍Tomcat配置详解。
@EnableConfigurationProperties(ServerProperties.class)
//  导入如下配置
@Import({ ServletWebServerFactoryAutoConfiguration.BeanPostProcessorsRegistrar.class,// 嵌入tomcatServletWebServerFactoryConfiguration.EmbeddedTomcat.class,// 嵌入JettyServletWebServerFactoryConfiguration.EmbeddedJetty.class,// 嵌入Undertow,nettyServletWebServerFactoryConfiguration.EmbeddedUndertow.class })
public class ServletWebServerFactoryAutoConfiguration {
}// 来看下嵌入的这些代码都干了什么?
// 先来看下EmbeddedTomcat这个类
// 初始化TomcatServletWebServerFactory是前提条件Servlet,Tomcat等类是要存在才生效
// 而我们spring-boot-web-starter主键里面默认是引入了spring-boot-starter-tomcat。
// 这些类是存在,反之我们看jetty的。
@Configuration(proxyBeanMethods = false)@ConditionalOnClass({ Servlet.class, Tomcat.class, UpgradeProtocol.class })@ConditionalOnMissingBean(value = ServletWebServerFactory.class, search = SearchStrategy.CURRENT)static class EmbeddedTomcat {@BeanTomcatServletWebServerFactory tomcatServletWebServerFactory(ObjectProvider<TomcatConnectorCustomizer> connectorCustomizers,ObjectProvider<TomcatContextCustomizer> contextCustomizers,ObjectProvider<TomcatProtocolHandlerCustomizer<?>> protocolHandlerCustomizers) {TomcatServletWebServerFactory factory = new TomcatServletWebServerFactory();factory.getTomcatConnectorCustomizers().addAll(connectorCustomizers.orderedStream().collect(Collectors.toList()));factory.getTomcatContextCustomizers().addAll(contextCustomizers.orderedStream().collect(Collectors.toList()));factory.getTomcatProtocolHandlerCustomizers().addAll(protocolHandlerCustomizers.orderedStream().collect(Collectors.toList()));return factory;}}// 反观jetty的初始化Factory。这里是server都是标红了。
@Configuration(proxyBeanMethods = false)@ConditionalOnClass({ Servlet.class, Server.class, Loader.class, WebAppContext.class })@ConditionalOnMissingBean(value = ServletWebServerFactory.class, search = SearchStrategy.CURRENT)static class EmbeddedJetty {@BeanJettyServletWebServerFactory JettyServletWebServerFactory(ObjectProvider<JettyServerCustomizer> serverCustomizers) {JettyServletWebServerFactory factory = new JettyServletWebServerFactory();factory.getServerCustomizers().addAll(serverCustomizers.orderedStream().collect(Collectors.toList()));return factory;}}
// 获取到了WebServer在操作Tomcat操作。
如图:

来查看下TomcatServletWebSeverFactory下创建WebServer
@Overridepublic WebServer getWebServer(ServletContextInitializer... initializers) {if (this.disableMBeanRegistry) {Registry.disableRegistry();}// 创建一个Tomcat服务,这里的就是apache的代码块了。// 如下图Tomcat的结果图进行对比代码。// 这里就是一个Server// 这里默认的一个Service是StandardServiceTomcat tomcat = new Tomcat();// 文件的路径,这里要获取jar文件目录,部署的目录。File baseDir = (this.baseDirectory != null) ? this.baseDirectory : createTempDir("tomcat");tomcat.setBaseDir(baseDir.getAbsolutePath());// 创建一个连接协议,这里传入的HttpNioProtocol// 一个Server可以有多个Connector。一种协议只能有一个Connector。Connector connector = new Connector(this.protocol);connector.setThrowOnFailure(true);tomcat.getService().addConnector(connector);customizeConnector(connector);tomcat.setConnector(connector);// 设置host,如果有新的web应用进来,可以自动发布应用。tomcat.getHost().setAutoDeploy(false);// StandardEngineconfigureEngine(tomcat.getEngine());// 这里可以自定义连接协议,比如非http等;for (Connector additionalConnector : this.additionalTomcatConnectors) {tomcat.getService().addConnector(additionalConnector);}prepareContext(tomcat.getHost(), initializers);return getTomcatWebServer(tomcat);}1、Tomcat回归
- 一个Tomcat只会有一个Server
- 一个Server有多个service
- 一个Service有多个Connector连接协议,有http,https,ajp等协议。
- 一个Service只有一个Engine(引擎)
- 一个Engine,可以有多个Host,每个Host代表一个虚拟主机,他可以包含多个Web应用。
- 每一个context表示运行在Tomcat的web应用
2、Tomcat的结构图

三、SpringMvc的DispatcherServlet关联Tomcat
还是原汁原味自动装配。
总纲:
1、还是回到@EnableAutoConfiguration这个注解,会自动装配一个叫 @DispatcherServletAutoConfiguration;
2、这个配置类会初始化1:DispatherServlet
初始2:DispatcherServletRegistrationConfiguration,在这里面初始化了DispatcherServletRegistrationBean,来看看这个类都继承了什么。
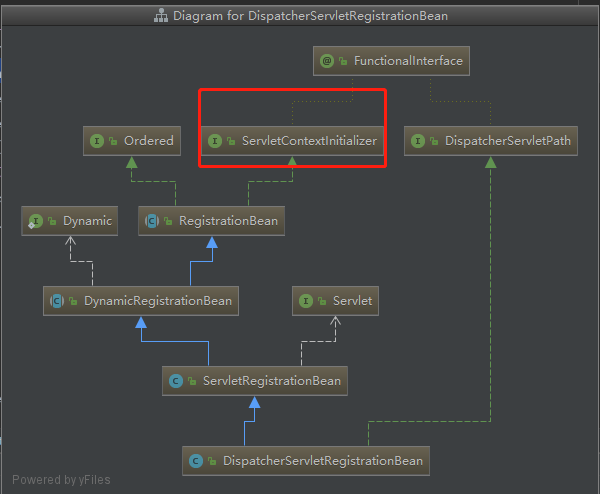
这个类很熟悉了吧。在初始化Tomcat。屡次出现;
这个类就能拿到ServletContext上下文了。在看看Tomcat的结构图。是不是就能对得起一些东西了。
3、DispatcherServletRegistrationBean从这个类来往上翻,看在那一层上实现了ServletContextInitializer,最终是RegistrationBean类实现ServletContextInitializer的onStartUp(),
在DynamicRegistrationBean上实现RegistrationBean的register功能。
4、直接上代码流程
代码如下:
// 先看自动装配
@Configuration(proxyBeanMethods = false)
@Conditional(DefaultDispatcherServletCondition.class)
@ConditionalOnClass(ServletRegistration.class)
@EnableConfigurationProperties({ HttpProperties.class, WebMvcProperties.class })
protected static class DispatcherServletConfiguration {@Bean(name = DEFAULT_DISPATCHER_SERVLET_BEAN_NAME)public DispatcherServlet dispatcherServlet(HttpProperties httpProperties, WebMvcProperties webMvcProperties) {DispatcherServlet dispatcherServlet = new DispatcherServlet();dispatcherServlet.setDispatchOptionsRequest(webMvcProperties.isDispatchOptionsRequest());dispatcherServlet.setDispatchTraceRequest(webMvcProperties.isDispatchTraceRequest());dispatcherServlet.setThrowExceptionIfNoHandlerFound(webMvcProperties.isThrowExceptionIfNoHandlerFound());dispatcherServlet.setPublishEvents(webMvcProperties.isPublishRequestHandledEvents());dispatcherServlet.setEnableLoggingRequestDetails(httpProperties.isLogRequestDetails());return dispatcherServlet;}@Bean@ConditionalOnBean(MultipartResolver.class)@ConditionalOnMissingBean(name = DispatcherServlet.MULTIPART_RESOLVER_BEAN_NAME)public MultipartResolver multipartResolver(MultipartResolver resolver) {// Detect if the user has created a MultipartResolver but named it incorrectlyreturn resolver;}}@Configuration(proxyBeanMethods = false)
@Conditional(DispatcherServletRegistrationCondition.class)
@ConditionalOnClass(ServletRegistration.class)
@EnableConfigurationProperties(WebMvcProperties.class)
@Import(DispatcherServletConfiguration.class)
protected static class DispatcherServletRegistrationConfiguration {@Bean(name = DEFAULT_DISPATCHER_SERVLET_REGISTRATION_BEAN_NAME)@ConditionalOnBean(value = DispatcherServlet.class, name = DEFAULT_DISPATCHER_SERVLET_BEAN_NAME)public DispatcherServletRegistrationBean dispatcherServletRegistration(DispatcherServlet dispatcherServlet,WebMvcProperties webMvcProperties, ObjectProvider<MultipartConfigElement> multipartConfig) {DispatcherServletRegistrationBean registration = new DispatcherServletRegistrationBean(dispatcherServlet,webMvcProperties.getServlet().getPath());registration.setName(DEFAULT_DISPATCHER_SERVLET_BEAN_NAME);registration.setLoadOnStartup(webMvcProperties.getServlet().getLoadOnStartup());multipartConfig.ifAvailable(registration::setMultipartConfig);return registration;}
}// 在看这个DispatcherServletRegistrationBean的族谱,上图已经明了,会继承到ServletContextInitializer
// 实现onStartup()
@Override
public final void onStartup(ServletContext servletContext) throws ServletException {String description = getDescription();if (!isEnabled()) {logger.info(StringUtils.capitalize(description) + " was not registered (disabled)");return;}register(description, servletContext);
}@Override
protected final void register(String description, ServletContext servletContext) {//servlet注册在这里完成 该方法由子类ServletRegistrationBean实现//servlet注册完后会返回一个registration对象,用于完成servlet-mapping的配置D registration = addRegistration(description, servletContext);if (registration == null) {logger.info(StringUtils.capitalize(description) + " was not registered (possibly already registered?)");return;}// servlet的mapping配置在这里完成 该方法由子类ServletRegistrationBean实现configure(registration);
}
四、SpringBoot的Tomcat及access配置项
Tomcat配置类:ServerProperties,以server开头。这个类在ServletWebServerFactoryAutoConfiguration中开启注入进来。
直接撸代码,在代码做注释
@ConfigurationProperties(prefix = "server", ignoreUnknownFields = true)
public class ServerProperties {// 这里就好解释,就是端口咯private Integer port;// 绑定网络ip,填写这个了,那么访问只能这个ip才能访问,亲测可以的;当然也是随便填写服务的ip,// 这个属性目前不是很明确要做什么,服务私有? 而且不是本机的ip,会报错的。private InetAddress address;// 配置爆出Exception后,跳转到指定的报错页面 -> BasicErrorController (这个类也是springboot实现的)// 尝试了下,没起作用,就放弃,现在更多的都是前后端分离,都使用@ControllerAdice// 具体放在yml中注明@NestedConfigurationPropertyprivate final ErrorProperties error = new ErrorProperties();// 看着意思是设置转发头部策略,好像这个不建议使用,没有尝试过// 有三种Native framework noneprivate ForwardHeadersStrategy forwardHeadersStrategy;// private String serverHeader;// 请求头部最大的size设置,默认8Kbprivate DataSize maxHttpHeaderSize = DataSize.ofKilobytes(8);// 连接器在关闭连接之前等待另一个HTTP请求的时间。不设置无效等待// 好像也什么用了。private Duration connectionTimeout;// 请求https-ssl证书加密,这个也没有用过,没尝试过@NestedConfigurationPropertyprivate Ssl ssl;@NestedConfigurationPropertyprivate final Compression compression = new Compression();@NestedConfigurationPropertyprivate final Http2 http2 = new Http2();// servlet配置,结构图可以参照下Tomcat结构图private final Servlet servlet = new Servlet();// tomcat配置类, 在yml上署名,这里重点说明下Tomcat配置。private final Tomcat tomcat = new Tomcat();// jetty配置类, 在yml上署名private final Jetty jetty = new Jetty();// netty配置类, 在yml上署名private final Netty netty = new Netty();// Undertow配置类, 在yml上署名private final Undertow undertow = new Undertow();// 这里是Servlet配置。public static class Servlet {// Servlet参数private final Map<String, String> contextParameters = new HashMap<>();// 路径 例如:/tk 请求路径http://xx:xx/tk/xxprivate String contextPath;// Servlet应用名称private String applicationDisplayName = "application";// jsp属性,这里都不展示,因为现在的框架基本都是前后端分离@NestedConfigurationPropertyprivate final Jsp jsp = new Jsp();// session会话配置@NestedConfigurationPropertyprivate final Session session = new Session();}/*** Tomcat配置项*/public static class Tomcat {// tomcat的accesslog配置,这里在下面具体配置上说明private final Accesslog accesslog = new Accesslog();/*** Regular expression that matches proxies that are to be trusted.*/private String internalProxies = "10\\.\\d{1,3}\\.\\d{1,3}\\.\\d{1,3}|" // 10/8+ "192\\.168\\.\\d{1,3}\\.\\d{1,3}|" // 192.168/16+ "169\\.254\\.\\d{1,3}\\.\\d{1,3}|" // 169.254/16+ "127\\.\\d{1,3}\\.\\d{1,3}\\.\\d{1,3}|" // 127/8+ "172\\.1[6-9]{1}\\.\\d{1,3}\\.\\d{1,3}|" // 172.16/12+ "172\\.2[0-9]{1}\\.\\d{1,3}\\.\\d{1,3}|172\\.3[0-1]{1}\\.\\d{1,3}\\.\\d{1,3}|" //+ "0:0:0:0:0:0:0:1|::1";/*** Header that holds the incoming protocol, usually named "X-Forwarded-Proto".*/// 看着是协议请求头设置private String protocolHeader;private String protocolHeaderHttpsValue = "https";// 端口请求头private String portHeader = "X-Forwarded-Port";/*** Name of the HTTP header from which the remote IP is extracted. For instance,* `X-FORWARDED-FOR`.*/private String remoteIpHeader;/*** Name of the HTTP header from which the remote host is extracted.*/private String hostHeader = "X-Forwarded-Host";/*** Tomcat base directory. If not specified, a temporary directory is used.*/// 根目录,存放一些日志使用的,一般就是 ".",  根目录private File basedir;/*** Delay between the invocation of backgroundProcess methods. If a duration suffix* is not specified, seconds will be used.*/@DurationUnit(ChronoUnit.SECONDS)private Duration backgroundProcessorDelay = Duration.ofSeconds(10);/*** Maximum amount of worker threads.*/// 最大线程数,默认是200,可以任务是临时工,有活来了,就要干。private int maxThreads = 200;// 最小工作线程,可以认为这是正式工,每天都要干活private int minSpareThreads = 10;// post请求,最大报文大小,默认2Mprivate DataSize maxHttpFormPostSize = DataSize.ofMegabytes(2);// 最大正文大小。这里说明下。这里跟spring里面也有一个文件大小设置的// 这两个是没有什么上下关系private DataSize maxSwallowSize = DataSize.ofMegabytes(2);private Boolean redirectContextRoot = true;private boolean useRelativeRedirects;// unicode设置private Charset uriEncoding = StandardCharsets.UTF_8;// 提问:Tomcat最大能承接多少连接?// 最大的请求连接设置private int maxConnections = 8192;// 如果请求数量超过了最大的请求连接,就会把连接存放在队列中。private int acceptCount = 100;// 所以Tomcat最大能承接的连接是 maxConnections + acceptCount - 连接使用完的。private int processorCache = 200;private List<String> additionalTldSkipPatterns = new ArrayList<>();/*** Comma-separated list of additional unencoded characters that should be allowed* in URI paths. Only "< > [ \ ] ^ ` { | }" are allowed.*/private List<Character> relaxedPathChars = new ArrayList<>();/*** Comma-separated list of additional unencoded characters that should be allowed* in URI query strings. Only "< > [ \ ] ^ ` { | }" are allowed.*/private List<Character> relaxedQueryChars = new ArrayList<>();// 连接超时时间,如果不设置,或者设置-1,那么就会无限时间连接。private Duration connectionTimeout;private final Resource resource = new Resource();private final Mbeanregistry mbeanregistry = new Mbeanregistry();		// Tomcat的accesslog设置public static class Accesslog {// 是否开启accesslog日志,默认不开启private boolean enabled = false;// # 在Servlet.getAttribute("token"),存在的时候才输出日志, 这里不在输出,一般应该不会选择这个。private String conditionIf;// ServletRequest.getAttribute(conditionUnless) 是否存在整个class输出private String conditionUnless;// 内容输出正则配置// "%{yyyy-MM-dd HH:mm:ss.SSS}t %h %A %l %user \"%r\" %s %b %D"// 这里的正则与logback差不多一致private String pattern = "common";// tomcat日志目录private String directory = "logs";// 文件输出前缀protected String prefix = "access_log";// 文件输出后缀private String suffix = ".log";// private String encoding;/*** Locale used to format timestamps in log entries and in log file name* suffix. Default to the default locale of the Java process.*/private String locale;// 检查日志文件是否存在,存在是否重新创建;private boolean checkExists = false;// 是否开启根据时间轮转日志,比如今天access.2023-06-14.log,明天access.2023-06-15.logprivate boolean rotate = true;// 是否推迟在文件名上加上时间;等轮转到第二天的时候,在加上;private boolean renameOnRotate = false;// 日志文件天数多少天删除private int maxDays = -1;// 文件名格式化时间戳private String fileDateFormat = ".yyyy-MM-dd";private boolean ipv6Canonical = false;// 请求是否带上request的属性,ip,端口,协议等private boolean requestAttributesEnabled = false;// 是否启用缓存,定时刷新到日志文件中private boolean buffered = true;}
更直观的通yml在展示下;
server:#  端口设置port: 5051# 绑定网络ip,填写这个了,那么访问只能这个ip才能访问,亲测可以的;当然也是随便填写服务的ip,# 这个属性目前不是很明确要做什么,服务私有?而且不是本机的ip,会报错的。address: 127.0.0.1# 开启设置请求content-type支持类型比如application/json;text/html;application/xml等compression:enabled: true# 设置context-path,http://localhost:5051/tk/test/getservlet:context-path: /tk#  设置会话,这块就不在做说什么。
#      session:
#        cookie:
#          comment:# 指定报错后,跳转/error页面,/error的实现Controller -> BasicErrorController# 没有尝试,好像没什么用。不过前后端都分离,更多都是用@ControllerAdiceerror:path: /errorinclude-exception: truewhitelabel:enabled: true# 重定向请求头部使用策略。没有对比过# forward-headers-strategy: native# 头部最大size,这里是kbmax-http-header-size: 8KB# 连接器最大超时时间,这里是指connector这个连接器connection-timeout: 100stomcat:# 存放一些日志等的目录,一般都是设置根目录,当然也不一定是basedir: .# 服务的接受和处理最大的连接数,默认:8192,如果超过这个数据,那么就会进入队列,accept-count# 这里很容易被面试,Tomcat最大能承接连接数???max-connections: 8192# 当请求的连接都接受和处理,那么传入进来的连接就会进入队列,这个是设置队列使用accept-count: 100# 最大工作线程数,默认200;并不是所有的服务线程都是使用  8191max-threads: 200# 最小的工作线程数,默认10min-spare-threads: 10# url解码字符编码,默认utf-8uri-encoding: utf-8# post请求最大内容大小设置,默认2M,如果设置-1,则不限制post请求大小max-http-form-post-size: 2MB# 可吞下的请求正文的最大数量,默认2MBmax-swallow-size: 2MB# 请求连接的最大超时时间connection-timeout: 60000ms# tomcat的accesslog配置accesslog:# 是否开启accesslog设置enabled: true# 是否把请求日志缓存起来,在定时缓存刷新,这里应该要设置false,为什么要设置false,这里不做讨论buffered: false# 存在日志文件夹下directory: logs# 放置文件拼接的文件名file-date-format: .yyyy-MM-dd# 格式化格式pattern: "%{yyyy-MM-dd HH:mm:ss.SSS}t %h %A %l %user \"%r\" %s %b %D"# 文件名前缀prefix: access# 文件名后缀suffix: .log# 是否推迟文件名中包含时间戳,知道轮换时间;意思就是先不在文件名上加时间,知道日志做分割的时候在做;rename-on-rotate: false# 请求是否带上request的请求属性,比如ip,端口,主机名等request-attributes-enabled: true# 是否启用日志分割; 未看到按照日志文件大小分割。这里应该按照时间来分割。随时间进行新建文件# 设置为true,比如今天是access.2023-06-14.log 明天就是access.2023-06-15.log;# 设置为false,那么就只会有一个文件rotate: true# 在Servlet.getAttribute("token"),存在的时候才输出日志, 这里不在输出,一般应该不会选择这个。condition-if: token# 删除日志保留文件前N天的accesslog日志,-1,不删除; 默认不删除max-days: -1# 检查日志文件是否存在,要是存在,是否重建;设置true就重建;设置false就不重建。check-exists: false
五、SpringBoot的Tomcat的优化建议
从第四章的tomcat配置了解到
能接收到连接数是通过server.tomcat.max-connections和accept-count来控制;
而处理这些连接线程控制是:server.tomcat.max-threads 和 server.tomcat.min-spare-threads
总结:
假设1:把连接数max-connections和accept-count设置过大;但是线程数max-threads不变情况;
但是功能可能处理过慢,线程数处理连接就过慢(硬件资源等问题)所以连接就会积压;要是连接上限触发connection-timeout;假设1:连接数设置过大,线程数处理不过来;第一:这里的线程数跟硬件资源;比如cpu。第二:跟代码程序原因;
假设2:把连接数max-connections和accept-count设置小;线程数设置大;
如果请求量大,所以就会触发连接数上限后,就触发连接拒绝;所以支撑不了更多的请求量。
总结:
1、设置最小工作线程:
最小工作线程:server.tomcat.min-spare-threads
这个本上是跟硬件资源有关,比如多少核,算力更快;4核,8核的;都不一样;所以这里建议是不做变更或者设置到10-50之间即可
2、设置最大线程数:
最大工作线程:server.tomcat.max-threads
这个跟上面的也是一样的意思;一般都是跟硬件和代码本身相关;比如程序需要耗费很多cpu资源等;需要很多算力的资源;所以这里就不能设置过大,一般是server.tomcat.min-spare-threads 的20倍左右,也就是在200-1000的左右。
3、设置最大连接数:
这个就没什么可讲的,一般现在做分布式集群服务,基本很满足业务;默认即可;